HTML
In this course, you will write programs that work with files, collect information from websites, and answer questions about documents. We start with HTML and CSS, spend most of the semester on Python, and finish with a web application that stores data in a database. No programming experience is required.
Each topic has a reading like this one, which stands in for a textbook. Most weeks have a lab that you develop on GitHub and submit through Gradescope. Gradescope runs automated tests, and you resubmit until you score 100%. The labs are all due the Wednesday after they are assigned. There is a short quiz most weeks, taken on paper and open-note, bring any notes you like, but no electronic devices. Every two to three weeks there is also a project where you build something and put it on the internet. There are no exams.
Build a homepage that introduces you, lists a few interests, and gives a visitor a link and a photo to explore. Start with an empty file and one sentence in the browser. In the first project, you will publish your own site so other people can visit.
Project Folder
Programmers write code in a text editor. A word processor like Google Docs stores formatting alongside your words. A text editor saves plain text, which is what we need for code. We will use Visual Studio Code (“VS Code”), a free editor used by professional programmers. We will also use GitHub to store each assignment and git to record and send changes. Git is the version-control program on your computer. GitHub is the website that holds a synchronized copy.
Course Setup
Complete the Course Setup before starting the first lab. It installs VS Code and Git, creates your GitHub account, and connects them. The first lab then walks through creating an assignment repository, cloning it, and submitting it.
For this reading, open the csci40 folder you made during setup with File → Open Folder… in VS Code. VS Code now treats that folder as your workspace, and the Explorer panel on the left shows its contents.
A website is a folder of files that link to each other. VS Code, your browser, and git all work with that folder as a unit. Get in the habit now of keeping every file for a project inside one folder.
Inside csci40, create a folder named homepage-practice and open that folder in VS Code. It will hold this reading’s homepage and its image. In the Explorer panel, click the New File icon and name it index.html. The .html part is the file extension, which tells the browser to read the file as HTML. Type a single line into the file so it is not empty:
<p>Hello, world.</p>Save it with File → Save (or Ctrl+S / Cmd+S). An unsaved file in VS Code shows a dot instead of an X on its tab. Save before reloading the browser, which reads the file from disk.
Find index.html in your file manager (not in VS Code) and double-click it, or drag it onto a browser window. The browser shows the words Hello, world. on an otherwise blank page. Keep VS Code and the browser side by side. After each edit, save the file and reload the browser.
This file is practice for the reading. The first lab will have you create your own repository from a course template, clone it inside the csci40 folder with VS Code, and repeat this edit-save-reload loop there.
Paragraphs
The <p> and </p> around Hello, world. mark it as a paragraph. They are part of HTML, which stands for HyperText Markup Language. HTML is a markup language: you write your content as plain text and then mark it up by wrapping each piece in a label that identifies it as a paragraph, heading, link, or another element. You describe what you want. The browser decides how to draw it. This is a different kind of language than the Python we will write later, where you spell out how to do something step by step.
Those labels are called tags.
Tags and Nesting
Give the homepage a title and a list of things you want to learn. HTML provides a different label for each kind of content.
A tag is a word between angle brackets, like <p>. Tags almost always come in pairs: an opening tag <p> and a closing tag </p>. The closing tag starts with a slash and contains only the tag name, while the opening tag may also contain attributes. Together with the content between them, the pair is called an element.
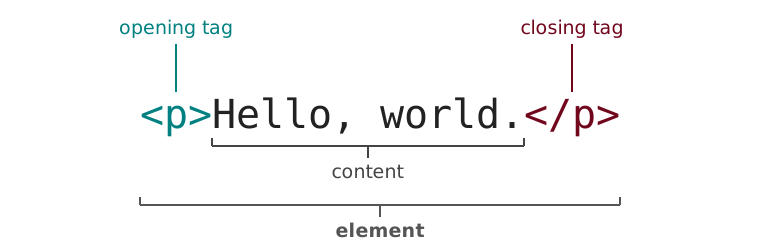
The opening tag says “a paragraph starts here,” the closing tag says “it ends here,” and the browser formats everything in between as a paragraph. HTML permits a few closing tags to be omitted in specific situations, but writing them explicitly makes the structure clear and avoids relying on the browser’s error-correction rules.
The p in <p> is one of a fixed vocabulary of tags the browser understands. A few you will use constantly:
- Headings,
<h1>through<h6>, from<h1>(the big title) down to<h6>(a small sub-sub-heading). - Paragraphs of text,
<p>. - Anchors,
<a>, better known as links. - Images,
<img>. - Lists:
<ul>for unordered (bulleted) and<ol>for ordered (numbered), whose items are<li>elements.
Elements can contain other elements, and this is where HTML gets its structure. When one element sits inside another we say it is nested, and the inside element is a child of the outside one. Nesting is how a list holds its items. For a first list of interests, add these course ambitions below your greeting:
<ul>
    <li>automate the boring stuff</li>
    <li>put it on the internet</li>
    <li>get paid</li>
</ul>
The <ul> element contains three <li> children and then closes. The browser would render the list identically on one line, but indentation helps you match each opening tag with its closing tag. Notice that the tags nest cleanly: each <li> opens and closes entirely inside the <ul>, never crossing over its boundary. Tags that overlap instead of nesting (<ul><li></ul></li>) are invalid.
The browser uses the tags to decide where the list items begin and end. Pressing Enter in the source is not a substitute for starting a new paragraph or list item: in ordinary HTML text, runs of spaces and newlines collapse to a single space. Use indentation to make the source readable and elements to give the page its structure.
(If a couple of those tags are new, that is fine, <strong> makes text bold, <div> is a generic box we will use often when we get to CSS.)
The Document Tree
The browser converts nested HTML into a tree of elements, which shows what belongs inside what. Programmers call this tree the Document Object Model, or DOM. The tree makes containment visible: a line connects each element to the elements directly inside it.
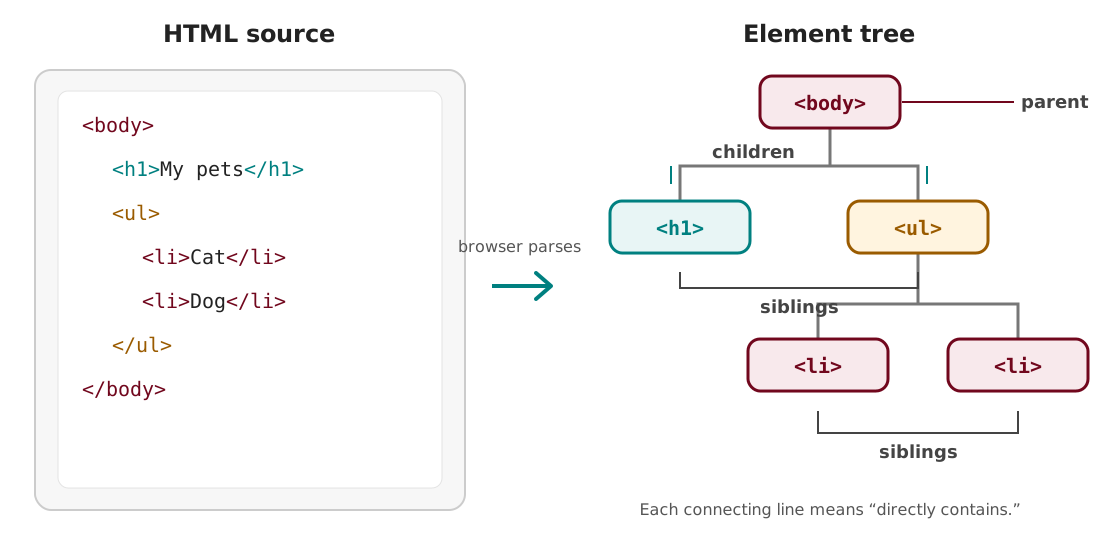
In the tree, <body> is the parent of <h1> and <ul> because they sit directly inside it. Those two elements are its children, and they are siblings because they share the same parent. The <ul> is the parent of the two <li> elements, which are another pair of siblings. The diagram leaves out the text inside the elements so you can focus on the nesting.
To turn HTML into a tree, make one node for each element and attach it to the element that directly contains it. To go the other direction, start at the top, write a node’s opening tag, write its children from left to right, and then write its closing tag. Indentation makes the levels of this tree visible in the source code without changing the displayed page.
Page Structure
Our visitor should see a title both on the page and in the browser tab. Those are different jobs, so they belong in different places in the document. An HTML page has a standard skeleton around its content, and every page you write this term will start from it.
First, tell the browser what kind of file this is and wrap the whole document in a single <html> element:
<!DOCTYPE html>
<html lang="en">
</html>
The first line, <!DOCTYPE html>, is a declaration that reads “this is modern HTML.” It is not a normal element and has no closing tag. Treat it as a required first line. Everything else on the page nests inside the one <html> element.
An HTML document has two parts, and they become its two children: a <head> for information about the page, and a <body> for the content you actually see. Putting them together gives the skeleton every page starts from:
<!DOCTYPE html>
<html lang="en">
    <head>
        <meta charset="utf-8">
        <title>My First Page</title>
    </head>
    <body>
        <h1>My First Page</h1>
        <p>Hello, world.</p>
    </body>
</html>
The lang="en" attribute names the page’s language, and <meta charset="utf-8"> tells the browser how its text is encoded. Keep both in each page you create. Read the skeleton from the outside in. The <head> holds the <title>, which is the text the browser shows in the tab and the name a search engine prints, though it is not shown on the page itself. The <body> holds what appears in the window: here an <h1> heading and a <p> paragraph. Paste this into index.html, save, and reload the browser: the tab now reads My First Page, and the page shows a large heading above your paragraph. Change a word between two tags, save, and reload to see the change. Then put the interests list from earlier back inside <body>, below the greeting, so the skeleton contains the work we have already done.
Can you predict what happens if you move the <h1> line above the <body>, into the <head>? Try it.
The browser may still show the heading because it repairs some invalid HTML as it builds the DOM. A page that looks right can therefore have a different tree from the one you intended. Move the heading back into <body> so the source states the structure explicitly.
Links and Images
Add a link the visitor can follow and a photo to illustrate your introduction. Both introduce a new idea, the attribute, extra information written inside the opening tag as name="value".
A link is an <a> element whose href attribute says where it goes:
<a href="https://rtealwitter.com">my webpage</a>The text between the tags, my webpage, is what the reader sees and clicks. The href is the destination they are sent to. Changing href changes the destination without changing the visible text.
For the photo, put an image named cat.jpg in homepage-practice. Use a photo you have permission to publish, and adjust the filename and description if yours shows something else. An image is an <img> element, and it is unusual in two ways:
<img src="cat.jpg" alt="a photo of my cat">First, it has no closing tag and no content between tags, because the content is the file it points to, so there is nothing to wrap. Second, it carries two attributes that matter: src, the filename or URL of the image, and alt, a text description. The alt text is what a blind reader’s screen reader speaks aloud and what shows if the image fails to load: it keeps your page usable by people who cannot see the image. Give each <img> useful alt text.
The browser resolves cat.jpg relative to the HTML file’s location. If index.html and cat.jpg are in the same folder, that name is enough. If the image is in a folder named images, use src="images/cat.jpg". The same rule applies to a link such as href="about.html": it opens another page in the same folder. Check the folder, spelling, and capitalization when a link or image fails.
Opening a page from your disk gives it a file: address that refers to your computer. Publishing puts those files on a web server, where other people can request them through an https: address. Keeping links relative lets the files move together from your computer to the server.
Complete Homepage
Put the pieces inside the document skeleton, with the visible content in <body>. This version uses the examples above. Replace the introduction, interests, link text and destination, and image with your own choices:
<!DOCTYPE html>
<html lang="en">
    <head>
        <meta charset="utf-8">
        <title>My First Page</title>
    </head>
    <body>
        <h1>My First Page</h1>
        <p>Hello, world. I am learning to build things for the web.</p>
        <h2>Things I Want to Learn</h2>
        <ul>
            <li>automate the boring stuff</li>
            <li>put it on the internet</li>
            <li>get paid</li>
        </ul>
        <p><a href="https://rtealwitter.com">my instructor's webpage</a></p>
        <img src="cat.jpg" alt="a photo of my cat">
    </body>
</html>
Save and reload. The browser shows the title, introduction, three list items, a clickable link, and the photo. The tab reads My First Page. Follow the link and check that the photo loads. If it does not, use the relative-path rule to compare its src with the actual filename.
Publishing the Homepage
Use the skeleton, headings, paragraphs, lists, links, and images in Project 0, where you will make a small site and publish it to the internet.
The browser has supplied the black text, white background, and default font. Next class, we will use CSS to set the page’s colors, fonts, layout, and spacing. Keep these references open as you work: this HTML cheatsheet for the tags, the matching CSS cheatsheet for next week, and Shay Howe’s Learn to Code HTML & CSS when you want the fuller story. Use the references to look up unfamiliar tags.